Table of Contents
CHAPTER 6: System Menu
Refresh
The “Refresh” function re-loads the data on the page currently open.
Configuration
Print Management
Visitor Badge / Visitor Briefing
The following procedures apply to both visitor badge and visitor briefing. Here, select the printer type and the printer itself for the visitor documents. Selecting printer type and printer can be performed individually for badge and briefing. The settings undertaken here will act as presets for printing, but individual adjustments are always possible within each document's print input dialog.
Rasterizer
As an alternative to the rasterizer provided by the respective printer driver you can use a software rasterizer when printing. Select the option 'Software' if you detect problems with the print quality to activate the software rasterizer. Please note that this option results in a higher memory usage.
Layout Template
vistrax offers various layout template for visitor badges and visitor briefings which can be managed by you. You have the options of creating a new template and editing or deleting existing templates. By clicking on “Preview” you can create a test printout of the selected template.
Creating and Editing Layout Templates
Creating new templates and editing existing templates are both performed via the “Edit Layout” input dialog which is opened by clicking on “New…” or “Edit…”.
The input dialog is divided into two main areas. On the left the current template properties are displayed with various options for adjusting the layout as desired. The right-hand area shows a preview in which you can monitor the adjustments made. By clicking the right mouse button on the preview area, you can open a context menu, in which then the display of bounding frames can be enabled for all elements. Text boxes should always be defined with the maximum space available to avoid that the text is cut off too early.
The properties and options are divided into the following areas:
Properties
This item displays the current name of the layout template as well as the name of a potential basis template. If you are creating a new layout, select a template for the new layout here. The “Status” option allows you to deactivate single layout templates. Deactivated templates cannot be selected for printing visitor documents during the registration process. You can navigate between the pages of a multiple-page template using the arrow button. The page currently being viewed is displayed in the preview. (Note: Changes to template formatting always apply to all pages).
Paper
For paper you should select the paper template intended for printing. You can choose from existing format templates, create your own paper format (see Creating and editing paper templates), and delete paper templates that are no longer required.
Background Images, Photos, Logos
The image media saved in vistrax can also be used when printing visitor documents as long as they are supported by the layout template. At this point you have the option of making the corresponding element visible or invisible. You can also replace a saved background image with a new image by clicking on “Import”. This section only allows options to be edited which are supported by the current layout template. All changes are displayed directly in the preview.
Formatting Caption, Label, Content and Footer
The last area offers you various options for formatting defined text sections. The text sections are defined as “Caption“, “Label”, “Content” and “Footer” and comprise all text elements allocated to these sections in the layout template (this allocation cannot be edited).
As well as changing the font and text size, you can also adjust the font style (bold (B), italic (I), underlined (U)), the justification (left justified (L), centered (C), right justified (R)) and the font color. The option “Size Automatically” is available when setting the font size. If this option is selected, the text is automatically scaled down if you choose a font size with which the text does not fit into the available space in the layout template. This ensures that all information can be displayed.
Creating and Editing Paper Templates
As well as creating new layouts and editing layout templates, you can also export existing templates or import new ones. This is performed by clicking “Import” or “Export”.
When importing and exporting you can choose between the following file formats:
XML:
XML file will be generated for export or accepted as an import. These files only contain the layout itself. Image data is not saved.
VXLT:
In contrast to the XML format, the VXLT format includes the layout and all image files incorporated into the layout template. After import, these are then available in the system into which the template has been imported. The format includes “only” those image files that are a permanent part of the layout, i.e. background images or logos which are not dynamically linked. Dynamic content such as company logos, employee photos etc. are not exported or imported. Further information on XML structuring can be found in Chapter 11: The XML layout scheme.
Importing and Exporting Layout Templates
Every layout template is allocated a paper template which is used for printing. The input dialog “Edit paper” can be used for creating and editing paper templates. It is available above the “Paper” area while layout templates are being created or edited.
The input dialog is divided into two main areas. In the left-hand area you can adjust settings for the paper format while in the right-hand area a preview of the formatting is displayed. As with the layout template, you also have the option of selecting a basis template on which your individual format template is based (“Type” selection list). As well as adjusting page sizes you can also define the lateral offset, element size, element margins and element orientation. Adjust the settings as required in the respective input dialogs. As an additional option you can also activate cutting markers. When activated, this prints cutting markers around each element to assist with cutting later. All changes are displayed directly in the preview.
Paper templates can also be imported and exported to allow their use on other vistrax systems. The corresponding function can be accessed by clicking “Import” and “Export”. Both functions operate with VXPT files.
Clicking “Print” displays a preview of the format template to check how the formatting will be handled by your printer.
For both layout templates and paper templates, basis templates cannot be overwritten or deleted, but must be saved under a new name after being edited.
Checklist
The Checklist menu item allows you to activate or deactivate the entire checklist function. In addition, the Agreement Text and Instruction Text can be set here when using the Signature Pad. These are taken from the dictionary and can be supplemented there with appropriate translations.
Data Export
Present and / or prepared visitors, visitor master data and company master data can be exported in XML or JSON format and as a multi-page PDF document. “Export” buttons in the application views can be clicked to start the export. The export can also be started by Command Line. Existing files will be overwritten.
Export Folder
This folder is suggested when exporting data. If the export is done by command line without specifying an absolute path, the export file will be stored in the specified folder.
Portables Document Format (PDF)
Currently DIN A4 or LETTER can be used as a paper format. In the case of automatic processing the user settings are evaluated. DIN A4 is used for metric values and LETTER for imperial values.
The font to be used in the PDF document must match the TrueType format. TTF and TTC files are supported. The compatibility is checked after selecting a font. To support a wide range of languages in a single PDF document, it is recommended to use UNICODE-based fonts that have extensive language tables.
Recommended Fonts (not included):
- Arial Unicode MS (v1.01)
Commercial font by Microsoft, largest character set. Detailed information and sources of reference: Microsoft Typography
- Code2000 (v1.17)
Shareware font by James Kass, large character set. Detailed information and sources of reference Code2000 Homepage
Attention
Shareware font by James Kass, large character set. Detailed information and sources of referenceNote
The PDF export does currently not support RTL (right-to-left) languages, such as Arabic or Hebrew. In such cases, the text is displayed incorrectly.Barcode Scanner Integration
For a barcode scanner to be used in check-in/check-out procedures, it must first be integrated in vistrax. Here, the device status can help you determine whether the barcode scanner should be activated or deactivated. The device types and interfaces supported by vistrax are pre-defined.
Under “Mode” you can choose between:
- Automatic check-in / check-out with or without beep:
After barcode scanning, visitors are automatically checked in or out - Manual check-in / check-out with or without bee:
After barcode scanning is complete the registration or check-out input dialog for the corresponding visit is opened
Under “Acoustic Error Tone“ you can choose the tone played if an error occurred::
- Sequence of 3 short beeps
- Long buzzing sound (available only for Magellan 1100i)
Attention
Currently only the Datalogic Magellan 1100i and Magellan 1500i barcode scanners are supported. However, these scanners only work if an initial setup has been made. Follow this step-by-step guide Magellan 1100i initial setup or Magellan 1500i initial setup . The support of further manufacturers and models will be extended in future software versions.Signature Pad Integration
In the Signature Pad Integration tab, the functionality to confirm checklist entries with a signature can be activated and deactivated. If the device to be used supports network use, the address and port are stored in this menu. All available devices are listed under the item “Name” for selection. In addition, general texts are stored which are not dynamically generated when the signature pad is displayed. These can be translated in the dictionary.
Computer Telephony Integration (CTI)
vistrax supports CTI / TAPI and offers you the option of starting a telephone call from the application. All TAPI-capable device drivers are supported. The “Prefix Number” determines a number which is added as a prefix to all calls (e.g. an outside line with “0“). If “CTI Telephoning” is activated, you can select valid telephone numbers with a double-click from within the application.
Image Acquisition
vistrax supports the direct acquisition of image data (i.e. company and mandator logos, visitor and employee pictures)
Standard Settings
- Image Folder
Here you have the option of setting a standard path to a folder which is opened when images are imported into a logo or photo editor.
- Face Detection
Activates automatic facial recognition when importing images.
Camera
- State
Activates the camera as the source for the image import.
- Interface
Selects the right interface („Windows XP (backward compatible)“ or „Windows 7/8/10 (advanced)“).
- Device
Selects the camera to be used for image import. If available, the system-wide device properties can also be modified.
- Format
Selects the video format or use „Automatic“ to find a suitable format automatically.
- Orientation
Chooses between „Landscape“ or „Portrait“, optionally mirrored.
- Preview
Shows video live-preview based on current settings.
Attention
On some Windows 10 versions (from 1803 onwards), the camera may not show an image, especially in automatic mode. The cause is a known error in Windows. Make sure you have installed at least version 1903 (please update via Windows Update ⇒ Advanced Updates if necessary). You can display the current version of Windows 10 with the application „winver.exe“. Right-click on the Windows Start icon ⇒ Run ⇒ winver. If you still get no image or a disturbed image, try changing the interface-setting and selecting the format manually, preferably with encoding „YUV2“. Alternatively, replace the camera with an up-to-date model that the manufacturer guarantees windows 10 compatibility for and install the latest Windows drivers and camera firmware. Also be sure to install the latest video card drivers.Media Browser
The media browser offers you an overview of all media files saved in vistrax. Files can be managed using a system similar to Windows Explorer.
License Management
Copy your personal license key and insert it into the corresponding field (i.e. using the copy and paste function). Clicking “Add” activates the license.
The upper table offers you an overview of the current licenses on the workstations in use.
Colored symbols in the left-hand column give additional information on licenses’ validity. A green dot designates a valid license and a gray dot designates an invalid or expired license. A yellow dot designates a used license on an update path
Connection Settings
Shows an overview of the current Connection and LDAP / ADS settings. These settings cannot be edited from this point.
To edit the settings, use the “vistrax Connection Settings” input dialog. Detailed information can be found in Chapter 10 “Connection Settings”.
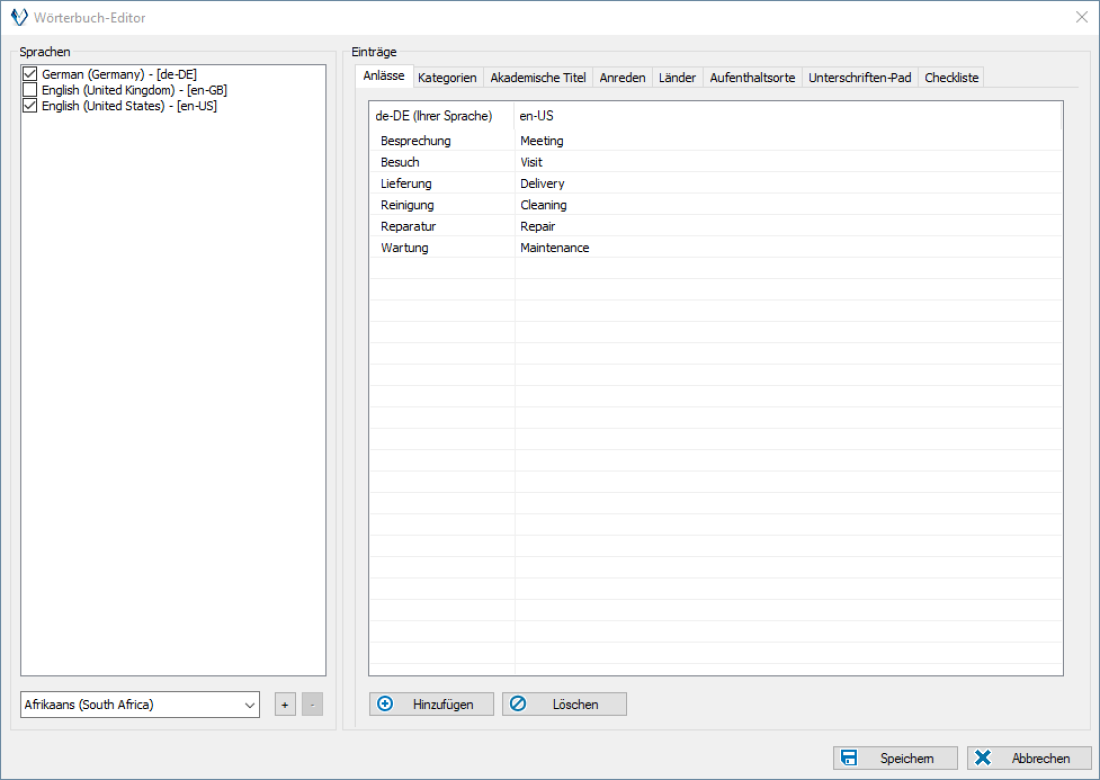
Dictionary
You can use the dictionary to maintain translations for the following selection lists:
- Visit Reasons
- Categories
- Academic Titles
- Salutations
- Countries
- Whereabouts
- Signature Pad
- Checklist
In the left part of the dictionary, translation tables for different languages can be created or removed. The selection menu below can be used for this purpose. If you add a language in the left area, it will appear as a new column on the right side of the configuration window and can be maintained by double-clicking with appropriate translations of already existing entries.
An entry can also be newly inserted and then translated for all activated languages by double-clicking. New entries can also be created using certain fields in the software (see list above). Such entries are automatically inserted in the dictionary and marked in blue.
If the language of the database is changed in the user settings, the entries in the above list are displayed in the specified language, assuming they are available. If there is no corresponding translation in the dictionary, the entry for existing records (e.g. a visitor) remains in the original language and is only translated after the dictionary has been updated.
Click here for a preview
Help
Selecting “Help…” opens the vistrax online help.
The drop-down menu on the right offers the following actions and informa
- „Check for updates…“
- „Online FAQ…“
- „Online Tutorials…“
- „Online Add-Ons…“
- „Online Shop…“
- „Online Support…“
- „Terms ofUse…“
- „About…“
Exit
Selecting this function closes the program