Table of Contents
CHAPTER 2: Visitor Management
Visitor Check-In / Visitor Preparation
vistrax offers two possibilities for registering visitors:
a) Registration Wizard
b) Quick Check-In
Please be aware that visitor preparation can only be performed using the registration wizard.
Registration Wizard
Visitor registration can be completed in five easy steps. If you have already saved visitor master data (see section "Companies" and "Visitors"), you can access pre-defined profiles in the input dialog by using the search function in the input fields. New master data can also be entered directly during the registration process.
1. Entering the visiting company
Select the company to which the visitor belongs in the “Filter” input field or create a new company profile. To create a new company profile, click on “New”. Clicking on “Next” takes you to the next input dialog.
2. Entering the visitor
Select a visitor name from the database or create a new visitor. To create a new visitor name, click on “New”.
3. Entering the visit
Enter more detailed information about the visit and the required documents here.
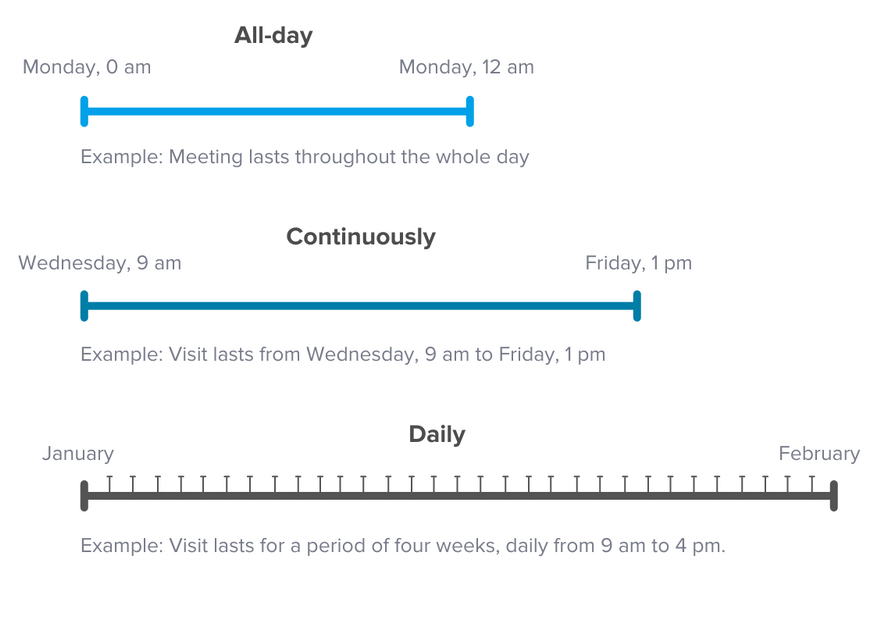
→ Visit validity period
Define the planned validity period for the visit. Check-in/check-out is still possible outside of this period. However, in this case a warning is displayed.
Day-Long: For a defined period without daily time limitations, 0-24h is preset
Continuous: From a start date + time to an end date + time
Day-To-Day: From a start date to an end date for a defined period of each respective day
Note
The Daylight Saving Time (DST) causes invalid times. These are in the time span, which is skipped by shifting the time forward and backward according to the local time zone. If such an invalid time is selected, vistrax possibly stores a different time which is within the valid range. The calculation of the deviation depends on the operating system. To avoid this, make sure to choose a valid date + time, so that no invalid point in time is selected.You should then fill in the obligatory fields “Employee” and “Reason”. Optionally, you may also use the “Division” field to filter employees. Likewise, you may add a vehicle registration number using the entry field “Vehicle” and include any additional individual information in the entry field “Remarks”.
→ Welcome message display
You can select from the list of options if and when the visitor data should be displayed via the vistrax Welcome welcome display. Here you have multiple options which can be set individually for each visit. Further information is available in the Online Help for vistrax Welcome.
→ Documents
The document area is used to enter whether the visitor should receive any documents, and if so which ones. The list of options contains vistrax templates. Under “Visitor documents” you will find information on how individual visitor documents can be created and modified. Click on “Next” to proceed to a print preview of the visitor documents.
4. Printing visitor documents
If you have selected that visitor documents are required, you will now see a preview of the visitor badge and/or briefing. For documents contained more than one page, click on the arrow button to view all pages. Select “Print page…” to print the current page. Select “Print all…” to print all pages.
Further detailed information on printing can be found in the section "The print dialog" in Chapter 8.
5. Registration data summary The summary shows all registration data entered. You may at this point decide whether the visitor should be checked in (“Check-In” or should be saved as prepared (“Save”). Prepared visitors can be further processed in the “Overview” or “Prepared” areas.
Checklists
Creating Checklist Entries
The checklist entries are managed under the “Entries” view. In addition to a name and a description, the texts displayed on a signature pad can also be set in the checklist entries, if the required rights have been assigned to the user profile. If a check-in or check-out text is set, this text will be displayed during the respective process. Both in the context of the entry selection in the checklist window and, if necessary, on a connected signature pad. You can also define the return type, a validity and a reference text for an entry.
The return type specifies whether an element associated with this entry must be returned at a specific time:
- Return not necessary
There is nothing else to consider here. The associated element does not have to be returned and therefore this entry has no effect on the check-out.
- Return required
It should be noted here that the element associated with this checklist entry must be returned. This affects the check-out process. For further information, see the additional hints for the check-out below.
The following options can be selected for validity:
- Once:
The confirmation is only valid once.
- Until Check-Out:
The confirmation is valid until the next check-out.
- Until last Check-Out:
The confirmation remains valid until the end of the visit.
- Time period:
The validity of the confirmation is limited in time by specifying the validity period in years, days and hours.
- Date:
The validity is given for one day on the specified date.
- Unlimited:
The validity of the confirmation is unlimited.
A standard reference text is a text template that can be overwritten by a user during a check-in / check-out process with the concrete element described therein. For example, in this field the text “Key number” can be specified in advance and then overwritten with the actual key number during a check-in / check-out process. This field does not need to be maintained, since a user can enter a reference text during the check-in / check-out process.
Note
To ensure that the reference text is also displayed on the signature pad during the check-in / check-out process, it must be referenced using the reference variable “REFERENCE_TEXT” in the relevant text field of the checklist entry.Creating Checklist Templates
The checklist template is a set of one - or more - checklist entries that are queried during a check-in or check-out. The checklist template consists of a name, a description and any number of checklist entries. For each checklist entry it can be selected separately whether a confirmation has to be made by a visitor, a responsible employee, a user or a receptionist. The following options are available:
- Required: The person specified must confirm the checklist. The checklist entry is initially checked.
- Optional: The person specified can confirm the checklist. The checklist entry is initially unchecked.
- Deactivated: Confirmation of a person is not requested.
This selection can be made separately for the check-in and check-out requirements.
Note
Both checklist entries and checklist templates must be activated after initial creation, otherwise they are not available for selection in the respective dialogs.
Note
Checklist entries and templates can be restored after they have been deleted.Confirmation at check-in / check-out
At the end of a check-in process, a window is opened for selecting the checklist template and carrying out the confirmation process, provided this was previously activated via the corresponding configuration menu. If you have previously created and activated a template, you can view and select it in the “Template” selection menu. By selecting the template, the entries assigned to it are subdivided and displayed according to their personal affiliation (visitor, employee, or user).
Depending on the behavior options set previously on the checklist template, the checklist entries displayed are initially checked. It is possible to enter a note and a reference text in the table later. The reference text entered here overwrites the standard reference text of the relevant entry. If further entries are to be inserted in addition to the existing ones, these can be added using the “Add entry” button.
Once the checklist has been set up, you can either confirm it manually using the “Verify” selection item or request a signature from the persons involved. The “Sign” selection item is only activated if a signature pad has been connected, activated and selected in advance via the configuration menu. If the confirmation is not to be made by the person entered in advance, another person can be selected via the “Signee” selection menu.
After successfully checking or signing the checklist entries, you can choose between “Finish” and “Print and Finish”. The latter opens a print dialog where you can select the contents of the receipt to be printed. Click the “Next” button to go to the printer selection.
Additional notes on check-out
Similar to a check-in procedure, the checklist window is also opened during a check-out. Please note that not only the checklist entries activated in the selected checklist template may be displayed, but also other entries that are assigned to this visit or visitor. They are displayed if, during check-in, a checklist entry with the requirement to return a handed over item has been selected.
If the return type “Return required” has been selected for a checklist entry and also confirmed during check-in, vistrax checks at which point in time the delivered element must be returned at the latest. This depends on the selected validity of the checklist entry concerned. A user can ignore the gray marked entries as long as the selected validity of the checklist entry has not been exceeded. If the validity has been exceeded, the user must either check the checklist entry and request the return of the affected items, or uncheck the checklist entry. As a result, a return of the affected item is postponed until the next visit of the visitor.
Examble
If, at check-in, something was handed over that must be returned at the end of the visit, the checklist entry associated with the item handed over will be displayed until it is returned. The return can be delayed until the visit is marked with “Finished” during a check-out. At this point at the latest, the return and confirmation of the persons involved should take place. If the return does not take place, the user can delay it until the next visit by deselecting the affected entry in the checklist.Quick Check-In
Quick check-in can be used to register visitors more quickly. When compared with the “Registration Wizard”, quick check-in does not include convenience functions such as a detailed view of the visiting company and visitor, the print preview or the summary. The rules for all data to be entered are the same as those described in the “Registration Wizard”.
Advanced preparation of registration is not possible using quick check-in. For this function, please use the “Registration Wizard”.
Visitor Check-Out / Processing Visitors Present
In the “Overview” or “Present” area you are able to check out present visitors and make some limited changes. To do this, select a present visitor by double-clicking or click on “Check-Out” after selecting a visit record.
A new tab will open showing an overview of all information regarding the visit of the respective visitor. Check “Gate” and “Check-Out” time and amend if required.
a) Check-out
When checking out, the following options are available:
- Check-Out: Check-out time
- Gate: Gate via which the visitor leaves the company
- Finished: The visit is classed as completed and will no longer be displayed with the prepared visits
- Notes on visitors, companies and visits
Check the visitor out by clicking “Check-Out”.
b) Edit
Check the visitor out by clicking “Check-Out”.
- Welcome Display: See Welcome Display in Chapter “Registration Wizard”
- Notes on visitors, companies and visits
Implement the changes with “Save”.
Overview, Present, Prepared
The three views “Overview”, “Present” and “Prepared” offer a quick overview of all visits. Visits can be filtered according to gate using the “Gates” filter function in the “User” menu group. → Overview The overview displays the prepared and present visitors.
Die Übersicht stellt die vorbereiteten und anwesenden Besucher dar.
→ Prepared
The menu item “Prepared” displays only the prepared visitors. Visitor check-in is performed via the interface provided.
 Within the validity period
 Outside the validity period
 Outside the validity period (past end date)
→ Present
The menu item “Present” displays only the visitors present. Visitor check-out is performed via the interface provided.
 Visit within the validity period
 Visit outside the validity period
A list of the present and prepared visitors can be exported (XML, PDF, JSON) or printed out.
Note
The PDF export does currently not support RTL (right-to-left) languages, such as Arabic or Hebrew. In such cases, the text is displayed incorrectly.The available functions can also be accessed via the context menu in the list view of the present and prepared visitors. After one or more entries were selected you can open the context menu via the right mouse button. The functions available depend on the number of selected items and the current user rights. The following functions are available:
→ Prepared
- Check-In
The Registration will be opened and a Check-In of the visitor can be performed.
- Details
A summary page with the important information of the selected record will be displayed.
- Edit
The registration will be opened and the selected record can be edited.
- Delete
One ore more selected records can be deleted.
- Change Validity
The validity of the selected items can be edited.
→ Present
- Check-Out
A Check-Out for the selected record can be performed.
- Details
A summary page with the important information of the selected record will be displayed
Companies
The menu item “Companies” allows you to manage the company data of your visitors.
You have the option of saving a company logo. This can also be used in the visitor welcome message. The logo should if possible be saved with a transparent background (in the PNG32 format). A captured or already saved logo can also be exported in the original format.
The following points should be noted during authentication:
- Access:
If access is not permitted, you will receive a warning message when the visitor in question attempts to check in. In order to continue the check-in regardless, a special user permission is required (“Check-in of unpermitted visitors”). The corresponding visitors are not displayed on the welcome display.
- Welcome Display:
See Welcome Display in Chapter “Registration Wizard”
Note
Master data records of companies can be pseudonymized according to GDPR, if the user has the appropriate rights (see section "Delete and pseudonymize records according to GDPR“ in Chapter 9).Visitors
The menu item “Visitors” allows you to manage the visitor data of your visitors.
The view of a visitor has three different tabs.
- Visitor: The tab is used to view and manage the personal data of a visitor.
- Checklist: An overview of all currently valid checklist entries for the selected visitor.
- Visits: The visit history of the selected visitor.
Visitor
You have the option of saving a visitor photo. This can also be used in the visitor welcome message. A photo can be imported or captured directly using a webcam. Thanks to the integrated facial recognition capability, an ideal crop of the picture will be suggested. A captured or already saved photo can also be exported in the original format.
The following points should be noted during authentication:
- Access: If entry is not permitted, you will receive a warning message if check-in is attempted. In order to continue the check-in regardless, a special user permission is required (“Check-in of unpermitted visitors”). The visitor is not displayed on the welcome display.
- Auto Check-In / Auto Check-Out: See Barcode Scanner Integration in Chapter 7 “System Menu”
- Welcome Display: See Welcome Display in Chapter “Registration wizard”
Note
Master data records of companies can be pseudonymized according to GDPR, if the user has the appropriate rights (see section "Delete and pseudonymize records according to GDPR“ in Chapter 9).With “Print receipt” you have the possibility to print a receipt for the current visitor which optionally contains the active checklist entries and the list of visits in addition to the personal data.
Checklist
In the checklist tab you can see valid checklist entries on the one hand, on the other hand you can create new entries or close valid entries via Add and Return.
Visits
A visit history is generated in the Visits tab, which lists all of the visitor's visits. With a double click, visits can be opened in a separate tab. This visit view represents an individual visit as it can also be viewed via the report or overview for active visits. This tab can also be used to confirm a visit at a later date, if this was not done during check-in or check-out.